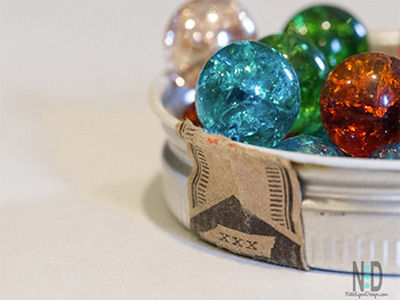
Fried marbles are ordinary glass marbles that are heated and rapidly cooled to create a beautiful cracked or shattered appearance inside the glass. They can be turned into necklaces, pendants, and other jewelry—and I’ve been making them for more than 20 years.
If you’re wondering how to make fried marbles or cracked marble jewelry, I’ll walk you through the process I use, from choosing the marbles and creating the crackled effect to turning a finished marble into a necklace.
What Are Fried Marbles?
Fried marbles—also called cracked or crackle marbles—are glass marbles with a network of fractures inside the glass. The internal cracks catch and reflect light, giving each marble a different appearance.
Once finished, the cracked marbles can be fitted with jewelry findings and turned into pendants and necklaces. Different marble colors create very different-looking pieces, and no two marbles crack in the same way.
How I Started Making Fried Marble Necklaces
At my first craft show back in 2001, I owned a fused glass business and made hundreds of these necklaces to hang around my craft booth. They were originally meant to be attention-getters, but they quickly became my number-one seller.

My great-grandmother was the person who first taught me how to make them. We used a cast-iron pan in her home to create the cracked marbles. Years later, I experimented with the materials and equipment I had available until I was able to recreate that same crackled-glass appearance.
I originally wrote a version of this fried marble tutorial for eHow in 2004. If you’ve come across versions of this project over the years, you may also remember my old fused glass business, FirenFusion.
What You’ll Need to Make Fried Marble Jewelry
- Glass marbles
- Metal pie pan or muffin tin
- Metal bowl
- Ice and water
- Jewelry bell cap bails
- E6000 glue or another adhesive suitable for glass and jewelry
- Jewelry jump rings
- Necklace chain or cord
- Two pairs of needle-nose or jewelry pliers
- Heat-resistant gloves
- Safety glasses

Choosing Marbles for Fried Marble Jewelry
I have had the best results with regular one-color or cat-eye glass marbles. In my experience, some two-tone marbles don’t develop the same internal crackling effect and may split instead. Flat-back glass marbles can also be used for some projects.
How to Make Fried Marbles
Fried marbles get their cracked appearance from thermal shock. The glass is heated and then rapidly cooled, creating fractures inside the marble that give it the crackled appearance.
Safety Note: This project intentionally subjects glass to rapid temperature changes. Marbles can crack, split, or shatter during the process. Wear safety glasses and heat-resistant gloves, keep your face and hands away from hot glass, and keep children and pets out of the work area. Use only equipment intended for high temperatures. Discard any marble that breaks, chips, or has loose pieces.
1. Choose your marbles: Use regular one-color or cat-eye glass marbles. Some types of decorative or two-tone marbles may split instead of developing the internal crackling effect.
2. Prepare the ice water: Place about 3 cups of water and five ice cubes in a metal bowl. Replace the ice between batches so the water stays very cold.
3. Heat the marbles: Place the marbles in a metal pie pan or muffin tin. Heat them in a 500°F oven for about 20 minutes. Occasionally a marble may crack or split while heating. Do not use any marble that breaks during this step.

4. Create the crackled effect: Wearing heat-resistant gloves and safety glasses, carefully remove the pan from the oven. Keeping your face and body back from the bowl, carefully pour the hot marbles directly from the pan into the ice water. The sudden temperature change creates the network of cracks inside the glass.
Allow the marbles to cool completely before handling them with bare hands.

5. Inspect every marble: Some marbles may break during the process. Discard anything that has split, chipped, developed loose pieces, or otherwise appears unstable. For jewelry, use only intact marbles with the crackled appearance contained within the glass.
How to Turn a Cracked Marble Into a Necklace
Once you’ve selected an intact cracked marble, you can turn it into a pendant with a bell cap bail, jump ring, and necklace chain or cord.
1. Attach the bell cap: Apply E6000 glue or another adhesive suitable for glass and jewelry according to the manufacturer’s directions. Attach the bell cap bail to the marble and allow the adhesive to cure completely before adding the jump ring.
2. Open the jump ring: Hold one side of the jump ring with one pair of pliers and the opposite side with the second pair. Gently twist the two sides in opposite directions to open the ring rather than pulling the ends directly apart.

3. Assemble the necklace: Slip the bell cap bail onto the open jump ring, then add the necklace chain or cord to the jump ring. The jump ring should pass through the hole in the bell cap bail, while the necklace chain or cord sits inside the jump ring.

4. Close the jump ring: Use both pairs of pliers to gently twist the jump ring back into its original position until the two ends meet securely.
Fried Marble Jewelry Ideas
Necklaces are only one way to use cracked marbles. Different sizes and colors can be incorporated into ornaments, sun catchers, and other decorative projects.
The internal crackling catches the light particularly well, which is one of the reasons these pieces attracted so much attention in my original craft booth.
A Craft I’ve Been Making for Decades
Fried marble necklaces have been part of my creative life since long before I first shared the project online. I learned the basic idea from my great-grandmother, made and sold the necklaces through my fused glass business, and originally published my tutorial through eHow in 2004.
All these years later, I still love how an ordinary glass marble can be transformed into something completely different. Experimenting with different colors is part of the fun because each finished cracked marble has its own pattern.
This site contains affiliate links that may provide a small compensation to me at no additional cost to you. Thank you for supporting this site.
WONDERFUL Post. Thanks for sharing.
I am including this RSS to my email and can look out for much more of your respective fascinating content.
You have really interesting blog, keep up posting such informative posts!
Thx for this great information that you are sharing with us!!!
Simple but interesting blog post I must say. I’ve just added your RSS to my google reader! =)
I like this site because so much useful material on here : D.
Thank you for this information! =)
Useful piece of information. Thank you for sharing.
Your website has some of the best mix of content that I have visted lately. I am very blown away by the design layout on your blog. The logo is extremely eye-popping and goes hand in hand with the theme! You officially have a fan! 🙂
Have you thought about making a video on this?
I never thought about making a video. I can though. I just made up a new batch last night. After Christmas I will make one and post it for you 🙂
where do you get the marbles from? All I can find are plain clear ones or glass gems.
Monica, Please see the scrolling pictures below the posting. If you click on the marbles you will be brought right to the page. It is getting more difficult to find them in town. I have expanded to the internet for my outlets.
Thanks for the details. I agree with another poster, I’d like to see a video too.
Do you do any other colors? I would love to have a purple one, just don’t think I could pull it off myself.
Currently, I have in stock following color: white, peach and green. I’ll look for additional colored marbles in Febuary and make up a few more batches. Just keep an eye on this post and see what I find 🙂
My mom had a crackle marble when i was little..i always wanted to see her jewelry box so i could look at it. I think she told me it was boiled,i am excited to show her this tutorial..thanks so much!!
Thank you for bringing back to memory a joyful time. My grandmother taught me this when I was about 10 years old. Back then we just crackled marbles for fun. Now I can use them in my jewelry making. Thank you again. And I enjoyed your tutorial. Very easy to follow.
Absolutely beautiful, now I have to raid the back shed to see if I have my childhood marbles in storage. One question, I don’t have a kiln, only a kitchen over that goes up to 250 degrees celsius. Will that still work????
Although it’s so bloody hot here in Perth, Australia, (42 degrees) I’m sure I can just put them outside for a while 😉
To Jolene: Your oven will work just fine :). Just leave the marbles in the oven a little longer, so the core temp be heated properly, and be sure that you have ice cold water to plunge them into straight from the oven. Remember, you can repeat the process again if you do not get the results you want the first time.
When do you glue the bail on to the marble? Before you connect the jump ring to it? I remember seeing marbles that were heated or I just saw them as a child, can’t quite remember. I would love to do this with my grandchildren. Thanks a lot of this info, that I had forgotten about. I love making all kinds of jewelry.
Cheryl, I normally glue the bail on first and then add the jump ring after the bail is dry. This will keep the bail from sliding with the weight of the jump ring. Once the bail is set, you will not have that problem.
What kind of glue or epoxy do you use to attach the marble to the bell cap?
Allie, I use E6000 glue because it holds to glass. It can be found at any discount or craft store.
I love these. I have made some just for myself but I can never find the color marbles I want. Where could I find more different colored marbles?
Me again, did it, it worked brilliantly, no breakages. On;y one problem, I got some dark scorch marks on a couple of marbles. Would baking paper or alfoil (I guess thats’s alumininum foil to you guys!) prevent this?
Hi! I live in Florida and I would love to order a few of these to use as part of my bridesmaids’ gifts! About how long do you think it would take to ship them? Do you have all of the colors in stock? Thanks : )
Sent you an email. Check your inbox.
I’ve looked everywhere for different colored marbles and I can’t find them, where can I buy different colored marbles on-line??? please response :)))
I currently purchase all my marbles from a local craft store. It is not a chain store.
What size bead cap do you use???
You can use any of the ones that are listed in the 2nd set of scrolling pictures located in the article. You don’t have to purchase them from here but that is a good supplier and the only one I know of right now.
I have been looking everywhere for the bail caps… Any clue where I can find some?
Use the scroll picture bar on this page. I have included a supplier on Amazon.com that carries them 🙂
Ah man, thank you so much for supplying a link to bail caps. I’ve been trying to locate some forever… for this very project.
I must thank you for the efforts you have put in writing this website.
I love all your high-grade content how to dos. This made a cheap but appeciated gift to many of my family members.
I love these necklaces and want to incorporate these in to our girls camp this year. I am having difficulty finding the bell caps that you use. What size do I need and where can I get them? Thank you
Please see the scrolling picture box on the bottom of the tutorial. The small siver pieces are the bell caps and if you click on the picture it will bring you to a supplier. I don’t carry them.
Hi, will this work for round glass beads as well or does the hole through it make it too weak to withstand the temperatures without breaking? Also, what sizes of marbles will this work for, i.e. will it work on the large player size marbles (16mm)? Thanks very much for posting this, I have a tendency to injur myself when I experiment so I thought I’d ask these questions.
Shelly, I have tried this method with round glass beads with a hole in the middle. Most split in half. The ones that make it through the process, I kept for 5 months. Almost every one of the beads ended up breaking in half or crackling. I use 8-10 mm marbles when I make my necklaces. The marbles that do not crack during the process, have not cracked afterword. I have not done used any marble past 10mm. I would believe 16mm marbles would work. Just remember you might need to leave the marbles in the oven a little longer because of the extra size. If you do not get the crackling effect you want after cooling in ice water put them back in the hot oven, straight from the ice water. They should crackle within the first minute. If that happens and you get the effect you want, do not place them back into the ice water.
Thank you so much Nikki!
Greetings! I know this is somewhat off topic but I was wondering if you
knew where I could get a captcha plugin for my comment form?
I’m using the same blog platform as yours and I’m having
problems finding one? Thanks a lot!
You will have to download from the web and then upload to WordPress. Here is the link: http://wordpress.org/extend/plugins/captcha/
I live in New Zealand and I can’t find the right kind of marbles anywhere for a cheap enough price. 🙁
Victoria,
I suggest using the scrolling picture box at the bottom of the blog post. The pictures of the marbles can be shipped direct to your home. Plenty of colors to chose from.
In the scrolling picture box on the page, right under the directions….click on the picture of the marbles. It will bring you to an online source.
I found some plain coloured marbles after a lot of searching, but sadly they are all a dark blue which doesn’t turn out as well. I suggest using lighter colours instead.
These are beautiful, Nikki! Have you tried using fishing line to give it a “floating” effect? I think that would be quite lovely. I used to buy “floating” diamonds and wear them (not real diamonds, of course), and they are really pretty; especially when you have a tan. I’d like to have some of these, but with the “invisible” chain. Thanks!
Carol
I have never tried it with a hole in the bead to tell you the truth. I would “think” it would make the bead hole too weak.