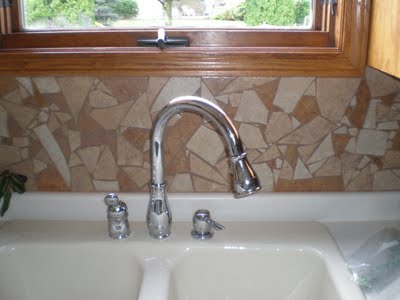
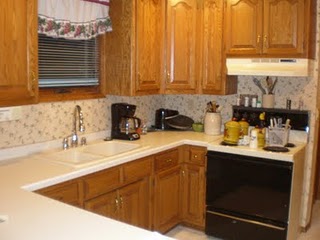
Tile adds beauty, durability, and value to any home. This mosaic tiled backsplash is low cost but very time consuming—allow an entire week of on-and-off work.
This was my first home improvement project that I have ever completed, so yes, a beginner can do it. Prepare yourself for many compliments! The end result is well worth the time and effort you put forth.
Things you will need
- Tile
- Towel
- Hammer
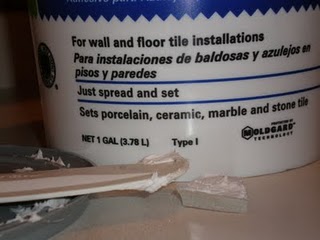
- Ceramic Tile Adhesive
- Grout (Pre-Mixed)
- Epoxy Grout Float
- Plastic Putty Knife
- Plastic Putty Knife / Paint Scraper 2″
- Grout Sponge
- Plastic Drop Cloth
- Vinegar
- General Purpose Scouring Pad
- Spackle
- Playtex HandSaver Gloves (XL)
- Safety Glasses with Wraparound Frame
Directions
Step 1
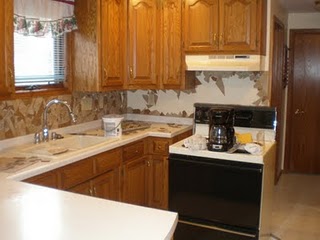
Prepare the kitchen backsplash for laying the tile.
Remove old wallpaper, tile, and any other wall material to get down to the plaster.
Clean, dry, and spackle any wall imperfections.
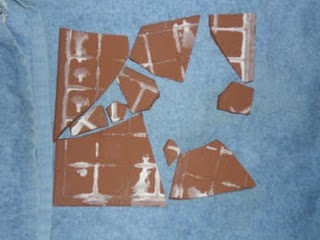
- Break the tiles by laying an old towel outdoors on concrete. Fold the towel in half lengthwise and place an individual tile upside down to prevent chipping. Fold the towel over the tile. Put on safety glasses. Using a hammer, strike the covered tile with medium force. Vary the size and shape of the pieces by repeating this process.
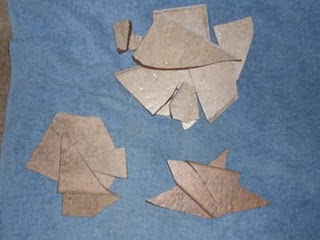
- If you are using various colored tiles for your project, sort them into separate colored piles. Sorting the colors will save you time when you are searching for the exact piece you need.
- Start your tiling project at an outer wall edge. Find tile pieces with at least one straight edge. Using a small spackling knife, apply a thick, even amount of ceramic tile adhesive directly onto the back of each tile.
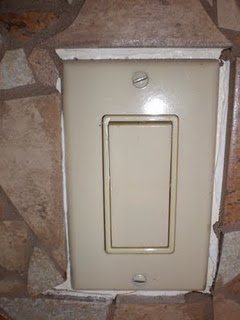
- When applying tile to the wall, line the straight edge tight to the outer wall edge and push firmly. Continue along the outside edge, then work your way inward like a jigsaw puzzle. Keep pieces roughly 1/16″ to 1/2″ apart for grouting. Tile around outlets, switch plates, and edges the same way.
- Once all tile pieces are adhered, check the wall for any gaps larger than about 1/2″. If needed, break a few smaller pieces and fill those spots. Wait 24–36 hours for the ceramic tile adhesive to dry.
- Spread a plastic drop cloth under the area you will be grouting. Determine if your tile is porous (will it absorb moisture). If it is, wet the tile with a sponge before grouting to help prevent staining.
- Work in small sections. Wet the tile before grouting each section. Put on gloves to protect your hands. Using a rubber grout float, apply grout generously. Hold the float at a 45° angle on the first pass, then at a 90° angle to remove excess and push grout into the cracks. Make sure cracks are filled evenly with no air bubbles.
- After grouting a small area, wait about 5 minutes. Wipe the tile with a damp sponge in a circular motion. This leaves a light haze—let it cure 4–5 hours. Continue until the entire backsplash is done.
- After 4–5 hours, use a kitchen scrubber and straight vinegar to remove haze from each tile. Buff with a clean, dry, white towel.
- After the grout has cured 24 hours, seal the area between the countertop/cupboard and the tile with clear caulk.


I didn’t know you could do something like this. Thanks!
You have really interesting blog, keep up posting such informative posts!
Simply wish to say your tile how to article is astonishing. The clarity in your writting is just great and even though I can tell you’re not an expert on the subject, I have to say you did a FINE job. It is easy to follow and understand. Thanks one million and please carry on the rewarding work.
I love the step by step effort you have put in this tile tutorial. I had never had seen this techinque done before, I love it. Thinking I could do this and just might try too. Simply stunning!
F*ckin’ tremendous artistic talent here and I mean that WITH respect. I am very happy to see your article. Thank you so much for sharing your time and talent with those, like me, that are lacking in this department. I like that fact you spell everything out so completely for me to understand. Keep them coming and I will read them.
I get irked when folks consider to do tutorials that they plainly don’t understand about. You managed to hit the nail upon the head and have outlined the whole process in a fashion I can understand completely. Will likely be back to get more. Thanks!
This blog is a good source of information. I designed my bathroom backsplash using your How to Use Broken Tiles to Achieve a Mosaic Back Splash, my project turned out wonderful. I have received many compliments.
I’m really glad that you’ve created your own website and have exposed the world to your thoughts and talents. I love your work and feel I can relate to what you’ve done. Many folks can’t even imagine having such talent. I hope that you know how lucky you are. 🙂 Good luck to you in all your endeavors. 🙂
Thanks a bunch for sharing this with us you really know what you’re talking about! Bookmarked and linked back from our website. Kindly additionally consult with my site =). Please consider a link exchange among us.
I want to thank you for this fantastic read!! I was looking to do something different with my kitchen and this looks easy enough to do without breaking the bank. It is something I can work on in steps, which is what I needed.
Amazing! This would be a way to salvage some of the tiles from old jobs that I do. I could repurpose them to achieve this look in kitchens and baths. Would you mind me using your pictures to show clients what can be done?
Benedict, I will reply via e-mail to this question. We can work something out through private messaging.