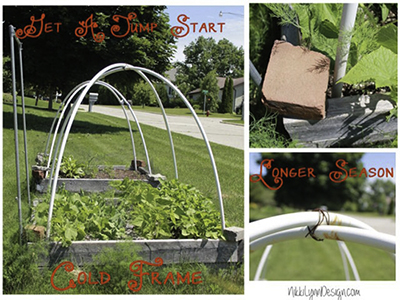
This DIY cold frame garden box was designed for garden boxes in areas of the country that receive frost. You can plant your vegetables earlier in the season and maintain them later in the season as well.
Materials:
PVC pipe
Plastic sheeting
Clamps
Wire
A shovel and some bricks.
Directions:
1.) Purchase all the materials you do not have already own to make a DIY Cold Frame Garden Box. When you purchase the PVC pipes be sure they have some flexibility. You can purchase huge plastic rolls of plastic at a home improvement store.
2.) Bend your pipes making to arches that will connect in the center. I found it easy to do this over the boxes to be sure I had the arch centered. I used a permanent marker to mark the center and then I wrapped wire around the center to hold it the two pieces of PVC pipe in place.
3.) After wrapping your pipe centers, use a shovel to dig down in each of the box corners. Insert your legs into the arch and cover with soil. Pack down the soil around the legs. Use bricks to secure the legs at each corner.
4.) Cover the outside of the structure with plastic. Use clamps to hold the plastic to the PVC arch. You can use the bricks in each corner to hold down your plastic too. I always use clamps for my doorway. It is easy to get in and out of the plastic this way.
When you want to get into the plastic, you can then roll up the doorway area. As the season goes on, you can remove the plastic. As the weather gets colder, you can replace the plastic around the structure.
Using this technique I can garden in December. Which gives me another two months of growing time. Great for my cool weather plants.
I also built a seedling cold frame for the same purpose HERE.
Both are not exactly pretty, but do the trick year after year. The DIY Cold Frame Garden Box project was cheap and does what I need it to do. I guess in the end, that is all that matters, right?
