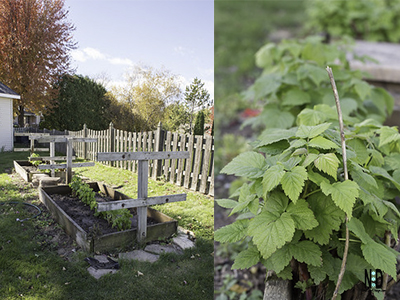
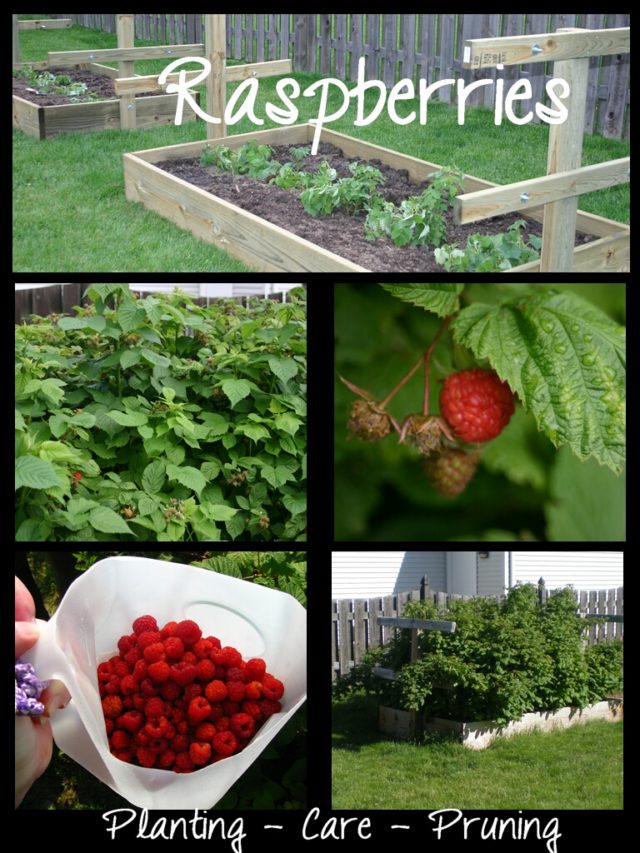
Starting and Maintaining a Raspberry Patch
Living directly in town I don’t have a lot of space to grow raspberries. I searched for ways for starting and maintaining a raspberry patch with little effort. Raised raspberry boxes were my choice.
Want to Start your Own Little Patch of Heaven?
I learned a lot over the past two years. I’d like to share a few tips and information I have gained.
First off, I chose everbearing raspberry plants. For me, it makes pruning an easy task. There are many plant choices out there. This posting centers around the everbearing variety.
Where to Plant Raspberries
Search for a location that has full daytime sun. You are able to plant raspberries in a partially shaded area but you will not receive the full benefit of your crop by doing so.

- Be sure to watch the location you have chosen to be sure that trees will not shade the area from receiving full sun.
- Chose a location that was not previously occupied by tomatoes, strawberries, eggplant, peppers or melon.
Wonderful Everbearing Varieties - Anne Gold Everbearing Raspberry Plant
- Brandywine Everbearing Purple Raspberry Plant
- Raspberry – Jewel
Preparing Your Soil

Preparing your soil is easy if you have chosen to construct a raised bed for starting and maintaining a raspberry patch.
Raspberries grow well in well-draining, sandy loam soils with added organic matter and a soil pH of 5.8 to 6.5. Contact your local extension office with a soil sample to check your pH levels or purchase a rapitest pH Soil Tester for under $7.00 and test your own.
Planting
Give your new plants a healthy start!
- Soak your new plant’s roots in water for two hours before planting.
- Cut the roots to the same length.
- Plant the raspberries 18″ apart in a row, with at least 8 feet between rows.
- Water the plants well.
Fertilizing

To maximize your annual crop, feed your canes in March with a complete fertilizer like 10-10-10 All-Purpose Fertilizer
This will increase early growth and produce larger canes, which will be more productive during the growing season.
Mulching
I prefer to mulch in between my raspberry rows and also in between my raspberry plants with grass clippings.
- It helps significantly reduce the number of weeds.
- Locks in moisture and saves time & money on the watering bill.
I’ve found that the raspberry roots are shallow and liked to spread. The weed roots like to tangle up with raspberry roots as they grow and using a hoe between plants seems to damage the roots.
Watering
1.) Snake a Soaker Hose Through The Canes

Make a practice of snaking a soaker hose through your patch at the start of the growing season.
It is an easy solution to watering your plants when there is a rainfall shortage.
2.) Use a Rain Gauge To Monitor Rainfall

Keep an eye on your rainfall. This is easily done by purchasing a rain gauge. Raspberries need 1″ – 2″ of water a week for healthy growth.
If the plants do not get at least an inch of rain during the week, place the soaker hose on.
Training
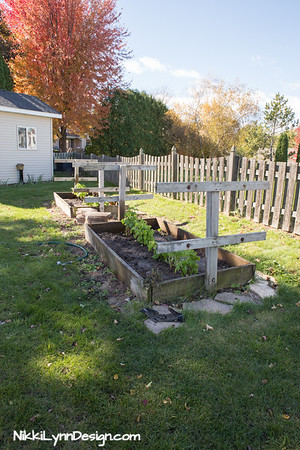
When we built our boxes we built them to include t-trellis and attached screw eye hooks to thread heavy wire through.
This allows us to keep the raspberry canes in a nice, neat fashion as the season goes on.
Additional Posts:
Raspberry Torte
Dyeing Cotton With Raspberries
Raspberry Freezer Jam
Harvesting

Harvest berries every 1-2 days when they are plump and red. The berries will come off without any resistance. Spread them out in a single layer when picking to keep from crushing the berries.
If you want a quick way to freeze them, freeze on cookie sheets in a single layer. Once the berries are frozen solid, add them to a large ziptop freezer bag.
Pruning
Why did I choose Fall everbearing raspberries? The plants do best when they are grown as an annual. They bear the fruit on the current year’s cane growth. The everbearing type raspberries require a different pruning technique and in my opinion, an easy technique.
In the fall after a hard frost cut down all the canes at the ground. Burn them or take them off the premises. Then in the spring remove all the new growing canes, except 4 canes per foot of each row. Let the 4 canes per foot of the row grow and produce berries.
After a Few Years
After a few years of established growth, the berry canes will shift toward the outside edges of your boxes in spring. I have found it easy enough to transplant them back into the center of the box.
To save me time and headaches, I found this to be the best way of starting and maintaining a raspberry patch with little effort. No guesswork.
Sharing Is Caring. Pin Me.
Other Posts That Might Interest You:


AFFILIATE POLICY: Posts on this site may contain links to outside vendors that pay me a commission when you purchase from them, at no additional cost to you. Thank you for supporting this site!